Eluna.AI: A Comprehensive Guide to Understand features, pros, cons, and much more
Eluna.ai is a state-of-the-art, AI-driven platform that helps automate productivity and workflows, image generation, and editing functions. The overview of the features, pricing, and pros and cons of Eluna.ai are given in comprehensive detail in this article.
Keep reading, keep learning!
Overview of Eluna.ai
There are lots of Generative AI tools out there in the market, but Eluna.ai stands bit different from them.
How?
Well, Eluna.ai uses deep artificial intelligence for users to be able to generate beautiful images, text, and undergo a multitude of varying other creative processes. The user interface is designed to be friendly for both beginners and advance users. Its goal is to make a community where people can come together, share their work, and get feedback, thus improve their creative skills.

Key Features
Key Features
Eluna.ai comes with a range of features that make this AI tool truly unique:
- Image Generation: Users can generate top-rated quality images with basic prompts. The program accommodates different styles and formats giving much space for creativity.
- Text Generation: Eluna.ai comes with text generation tools that are befitting text creation beside the visual work.
- Community Interaction: Eluna enables the sharing of developments with the other creators, display of creations with other creators, and constructive feedback engagement.
- Templates and Editing Tools: Eluna has various templates and editing tools that make it easy and time-saving when coming up with creatives.
- Wiz GPT Tokens: Each user gets tokens redeemable when generating content, making it more useful for creating text and image content.

Pricing Plan
Pricing Plan
Eluna.ai has two major subscription plans tailored to suit varied customers’ needs:
1. Basic Plan: This plan costs $10 when billed annually. The features one enjoys using this plan include;
- 1,500 credits per month
- 5,000 Wiz GPT tokens hourly
- Priority queue for fast rendering
- Access to community exclusively
- Priority support
- Beta access to all new features
2. Pro Plan: This plan costs $20 every month, billed annually.:
- It has all the features of the Basic Plan, plus
- 5,000 credits each month
- 10,000 Wiz GPT tokens per hour
The transparent pricing model gives everyone the power to choose a plan that can effectively fit in their pocket.
Pros and Cons of Eluna.ai
There are no online tools that wouldn’t come with pros and cons. Eluna.ai is also a no exemption. So, here are the pros and cons of Eluna.ai.
Pros:

Pros of Eluna.ai
Users have commented positively on Eluna.ai, some of the benefits being:
- Friendly Interface: It has a very neat and clean interface that is easy to use regardless of the level of the expertise of the user.
- High-Quality Output: Users say that Eluna.ai is great at making striking images and texts; most of the time, they are in line with their intended specifications.
- Community Support: Its widespread community works together on learning and, in turn, offers tremendous help to creators.
- Reasonably Priced: Eluna.ai features competitive pricing and even free options (for limited period), which brings great value to the interested individual or business wanting to engage with AI for creative works.
- Updates: The development team listens to the user feedback constantly and continuously adds new features, thus improving the capabilities of the platform over time.
Cons:

Cons of Eluna.ai
Despite the mentioned advantages of the product, there are some disadvantages that should also be inducted into the consideration of target users:
- Data Privacy Concerns: The platform works on data in the cloud, so users might feel worried about the security and privacy of their data.
- Accuracy Issues: The output produced, though coming from complex algorithms, may have some inaccuracies and may need to be validated by the user.
- Limited Customization Options: The platform may not offer some specific customization options that the user may require, driven by some unique use cases, which need developmental effort.
- Dependency on Input Prompt: Output quality is as good or bad as inputs. Bad prompts lead to bad results.

What Industries Benefit the most from Eluna.ai?
What industries benefit the most from Eluna.ai?
Eluna.ai benefits, almost by default, any business since it can be used for image generation, text processing and any creative workflow that applies AI technologies:
- Marketing: Eluna.ai helps speedily analyze customer feedback and social media posts for positive and negative sentiments. This can then make for better customer satisfaction and more rightful marketing strategies.
- Customer Service: Now, the customer service teams can understand customer needs with the help of topic modeling and keyword extraction which can help in improving the overall customer experience.
- Product Development: Predictive analytics helps the product teams in making educated decisions aligned with qualitative data from the past towards better products and services, thus meeting the customers at their point of need.
- Graphic Design: It complements, rather than competes with, high-quality, experienced, and skilled graphic designers, as it makes things easier for them and increases efficiency without detracting from the human touch or creativity.
- Photo Editing: Re-imagine your photos through Eluna.ai and get genuinely original artwork. This might be a source of side income through monetizing one’s craft!
- Game Development: The developers can easily and quickly build an effective environment for their game worlds by using the AI-generated 360° skyboxes and virtual worlds.
- Virtual Reality: The AI-generated 360° skyboxes can easily be implemented for the creation of immersive experiences using VR applications of Eluna.
Conclusion
Eluna.ai is a powerful, practical tool for applying AI to user’s creative workflow. The combination of features such as user-friendly, community engagement, and competitive pricing makes it very appealing to both individuals and businesses. Yet, granular features, especially with respect to the data privacy policy and the need for accuracy in the prompt are very important to consider before finally signing up to the application.
Overall, Eluna.ai is certainly a giant leap forward in AI-powered creativity and arms the user with the capabilities to innovate and express their ideas with excellence. Whether in marketing, customer service, graphic design, picture making, or video game development, the AI-powered tools of Eluna.ai can be used to heighten flexibility in working processes and support the creation of highly creative and premium-quality content.
Aerodrome Finance: Comprehensive detail about central trading and liquidity marketplace on Base
Aerodrome Finance has risen to fame in the world of decentralized finance with the promise of offering next-generation Automated Market Maker designed to be the central liquidity hub for Base’s Blockchain ecosystem. It comes with a powerful liquidity incentive engine, vote-lock governance model, and an easily usable interface.

The Rise of Aerodrome Finance
The Rise of Aerodrome Finance
Aerodrome was launched on 28th of August, 2023 on BASE network. It came as a response to the increased demand for a more efficient and user-friendly DeFi platform. In that, the project developers recognized the necessity of a liquidity solution that will easily integrate with the Base blockchain to provide a robust and scalable infrastructure for decentralized trading and asset management.
The major factors that set Aerodrome Finance apart include the liquidity incentive engine. The high-powered mechanism encourages users to provide liquidity to the platform and thus ensures a deep, stable pool of assets for traders. With its rewards mechanism for liquidity providers in place, Aerodrome Finance has tapped into a wide array of participants, such as, anyone from individual investors to large institutional players.

Governance and Decentralization
Governance and Decentralization
The governance model used by Aerodrome Finance is equally impressive. The project, through a mechanism of vote locking, gives AERO token holders the sole discretion for making decisions based on the governance of the platform. Through locking in their AERO tokens for a period, the holders obtain permission to vote, which will finally decide various aspects such as the protocol fee-sharing, the nature of new inclusions, and guiding the platform moving forward.
This decentralized way of governance helps Aerodrome Finance be very responsive to the needs and preferences of the community, creating in users a sense of ownership and engagement. As the platform further evolves, it will be the vote-lock system that plays a major role in deciding what’s next for it, since the development of Aerodrome Finance will then be much more aligned towards the interest of stakeholders.

Liquidity and Trading Efficiency
Liquidity and Trading Efficiency
At the core of Aerodrome Finance’s offering, is its decentralized exchange functionality bringing together the power of automatic market makers for easy token swaps and liquidity provisions. With its complicated algorithms and data-driven models in spread tightening and efficient pricing, it becomes possible for traders to have a user-friendly and cost-effective experience.
A major advantage of the AMM from Aerodrome Finance is that it handles massive trading volumes cleanly without suffering huge slippages or price impacts. This is rather crucial in DeFi, where users take part in large transactions and therefore become highly liquid to undertake their trades effectively.
Have you heard about Vitalik Buterin? Read about this gentleman here

Integrating with the Base Ecosystem
Integrating with the Base Ecosystem
Aerodrome Finance becomes highly important in its value proposition for performing integration with Base Blockchain Ecosystem. Since it is a decentralized exchange built on top of the Base network, it inherits all the scalability, security, and interoperability features of the Base blockchain. In line with that, Aerodrome Finance can leverage the growing Base ecosystem of DApps and protocols in a bid to further expand the asset and trading pairs available to users.
The integration between Aerodrome Finance and the Base ecosystem opens up new opportunities for sharing liquidity across chains and bridging assets. This feature essentially implies that the users have the ability to utilize a wider range of digital assets in this highly connected DeFi environment, enriching user experience and increasing the pool’s liquidity depth.

Challenges and Considerations
Challenges and Considerations
While it’s an undeniable success for Aerodrome Finance, the platform comes with a couple of challenges. Just like any decentralized protocol, it needs to get through the inherent complexities and difficulties of regulatory compliance, security vulnerabilities and the ever-evolving landscape of blockchain technology.
A major consideration is the ability of the platform to run and sustain its liquidity incentive model over the longer term. As the DeFi space is maturing further, it would be intensified by the liquidity providers, therefore needing Aerodrome Finance to constantly fine-tune the incentive structures in line with dynamic market conditions.
In addition, the reliance on the Base blockchain ecosystem creates an added layer of interdependence to be kept under observation. Any high-impact change or disruptive event on the Base network can also disrupt the workings of Aerodrome Finance and change the experience of the end user accordingly.
Interested in Sui Network? Then check out if its worth your attention

How do I store Aerodrome Crypto (Finance)?
How do I store Aerodrome Crypto (Finance)?
The tokens of Aerodrome Finance can be stored in any wallet that supports the token. The following comprise a few:
- Ledger Base Account: You can store AERO tokens in a Ledger Base account. Access the ‘Tokens’ section within your Base account; you will have options to manage your AERO tokens.
- Trust Wallet: It is the other storage available for AERO tokens. Hundreds of different cryptocurrencies, including AERO, can be supported with the wallet.
- Coinbase Wallet: You can be assisted in storing AERO tokens by the Coinbase Wallet. This wallet is highly secure with a friendly interface to users in controlling their AERO balance.
- Metamask Wallet: This is a decentralized wallet with millions of assets and across blockchains. You can store and trade your AERO tokens on it.
- Non-Custodial Wallets: You can store AERO Token in non-custodial or selfcustodial wallets. Such wallets will let you have full control over your private keys.

How to buy Aerodrome Crypto (Finance)?
How to buy Aerodrome Crypto (Finance)?
Buying AERO tokens involves the following steps:
- Select an Exchange: Look for and select a trustworthy cryptocurrency exchange that is hosting Aerodrome Finance for trading. Some popular options include Coinbase, KuCoin, CoinEx, and gate.io. Compare them in terms of fees, security, user reviews, and so on.
- Create an Account: Open your account by signing up on their website or mobile application. After that, provide personal information and complete identity verification if needed.
- Fund Your Account: Log in and fund your exchange account with funds via bank transfer, credit card, or debit card.
- Go to the Aerodrome Finance Market: On the exchange marketplace, search for “Aerodrome Finance” (AERO).
- Select a Transaction Amount: Input the desired amount of AERO you want to buy. In this step,
- Confirm Purchase: Preview details of the transaction and click the “Buy AERO” or similar button.
- BOX Transaction Done: Following this, your AERO will then be processed and deposited into your exchange wallet within minutes.
- Transfer to a Hardware Wallet: It is very highly recommended, for security reasons, that you send your AERO tokens to a Ledger or Trezor hardware wallet.
Interested in Meme Coins? Then you must check out the Best Solana Meme Coins
Conclusion
Aerodrome Finance has evolved as a game changer within decentralized finance. A strong incentive liquidity engine, the decentralized governance model, and an easy integration with Base blockchain have combined to set a new benchmark in DeFi. Moving forward, given the ever-changing nature of the industry, it will establish its position further in being one of the major players in decentralized finance through its ingenuous approach toward innovation and dedication to user-needs-driven design.
PAAL AI: A comprehensive guide for purchasing this cyptocurrency
Are you in any way interested in acquiring PAAL AI cryptocurrency or exploring other digital currencies? Welcome at the right place!
There are several ways to buy PAAL AI cryptocurrency. Learn all the ways you can purchase this cryptocurrency in this article.
Centralized Exchanges (CEXs)
PAAL AI can easily be bought via an exchange or broker, thereby making it quick and convenient for beginners. When selecting a centralized exchange, ensure that it supports PAAL AI cryptocurrency. Confirm that your selected exchange has solid security, liquidity, and a competitive fee structure.

Crypto Wallets
Crypto Wallets
If your concerns are mostly about security and holding your crypto assets then you may want to buy and store PAAL AI cryptocurrency using non-custodial wallet, like KuCoin Wallet or MetaMask. Leading Web3 crypto wallets like MetaMask and KuCoin Wallet, let you buy or swap thousands of cryptocurrencies with couple of swipes.
If you have to get something then what do you do? You will find reputable and trustworthy source that will not create any problem for you. Similarly you have to find a trustworthy and reputable crypto wallet. Browser extension or download the wallet on your smartphone. Then create or import an existing crypto wallet address to store send and receive crypto and NFTs.
Decentralized Exchanges (DEXs)
While centralized exchanges like KuCoin provide their clients with buying and selling services for digital assets with the help of self-executing smart contracts, decentralized swap exchanges ensure trustless crypto trading based solely on blockchain solutions.
Uniswap is the largest DEX that was adopted by the masses and has the capability to support thousands of crypto trading pairs. Additionally, most of the tokens are based on EVM-compatible networks such as Ethereum and Polygon.

How to Buy PAAL AI cryptocurrency from Centralized Exchanges (CEXs)?
How to Buy PAAL AI cryptocurrency from Centralized Exchanges (CEXs)? A Step-by-Step Guide
Buy PAAL AI cryptocurrency with a Centralized Exchange. A centralized exchange is the easiest and most popular place to buy, hold, and trade cryptocurrencies. Below is how you can buy this cryptocurrency with a centralized exchange:
- Choose a centralized exchange (CEX): Find a reputable and reliable platform that supports PAAL AI cryptocurrency purchasing. Most exchanges provide information relating to the ease of use, fee structure, and supported payment methods on their sites.
- Sign up and log in: Sign up and key in the required information and then select a secure password. Enable 2FA by Google Authenticator and turn on other available security settings to safeguard your account.
- KYC verification: In many cases, secure and reputed exchanges will ask you to complete KYC. The amount of KYC required may vary according to nationality and region. For Non-KYC customers, they can only access the basic features and services of the platform.
- Payment account provision: Follow instructions on exchange to add credit/debit card bank account, or other payment. Depending on your bank’s security requirements you may need to provide following information.
- Buy PAAL AI cryptocurrency: You can easily purchase this cryptocurrency with fiat if it is supported. You can also do a crypto-to-crypto exchange by purchasing a popular cryptocurrency like USDT first, and then exchanging it with your desired PAAL AI cryptocurrency.

Purchase PAAL AI cryptocurrency from a Crypto Wallet
Purchase PAAL AI cryptocurrency from a Crypto Wallet
You can directly buy some cryptocurrencies from some crypto wallets. Follow the next steps if you can purchase this cryptocurrency on the wallet of your choice:
- Select wallet: First of all get good and reputable crypto wallet that supports chosen cryptocurrency.
- Download app: Download wallet app on your device. Find it from Google Play Store App Store, or as a browser extension.
- Create wallet: Create a new wallet address or input the wallet address of the one you’re using. Make sure you write down the seed phrase. It’s crucial to keep it secure If you lose it. There is no one in the world that can help you regain your wallet.
- Buy PAAL AI cryptocurrency: Get the cryptocurrency using a supported mode of payment. Confirm the fees, since they may be higher than the ones charged by exchange platforms.
- Swap for PAAL AI cryptocurrency: If your wallet does not support the direct purchase of the fiat to PAAL, you can use a more popular currency such as USDT first and swap it for PAAL AI in your crypto wallet or a decentralized exchange.
Most of the crypto wallets that enable fiat-to-crypto purchases do not handle payments directly. Instead, they defer to third-party payment processors. Check and make sure you are okay with their fees before making purchases.

Buy PAAL AI cryptocurrency on a Decentralized Exchange (DEX)
Buy PAAL AI cryptocurrency on a Decentralized Exchange (DEX)
In buying PAAL AI cryptocurrency on a decentralized exchange, you will be working with individual sellers without involving middlemen. It is a good way to maintain your privacy since you don’t have to sign up or verify your identity. You will own your crypto assets in full through self-custodial wallets. Follow the procedures below to know how to buy PAAL AI on a DEX.
- Choose a DEX: Pick a decentralized exchange that has PAAL AI cryptocurrency. Open the DEX app and connect your wallet. Ensure your wallet works on this network.
- Buy base currency: In order to buy yourself some PAAL, you will first have to own the base currency as DEXs currently only support crypto-to-crypto exchanges. You can buy the base currency from a secure centralized exchange like KuCoin.
- Send the base currency to your Wallet: After buying the base currency, transfer it to your web3 wallet. Create a transfer; note most transfers will complete in minutes.
- Swap your base currency for PAAL AI cryptocurrency: You are ready to swap then your base currencies for PAAL AI cryptocurrency.
Ensure you have enough Blockchain native tokens, like ETH on the Ethereum Blockchain, to pay for transaction fees. Pay attention to slippage and adjust slippage tolerance according to your preferences.
How to store PAAL AI cryptocurrency?
The best way to store PAAL AI cryptocurrency based on your needs and preferences.
Review pros and cons to find the best way to store PAAL AI cryptocurrency.

Store your PAAL AI cryptocurrency on an exchange
Store your PAAL AI cryptocurrency on an exchange:
Holding your funds on exchange provides most convenient access to investment products and features such as spot and futures trading, staking, lending and much more. The exchange will securely hold funds. You don’t have to go through hassle of managing and securing your private keys. However, you need to select an exchange that implements strict security measures. Do your business with peace of mind. Knowing your crypto assets are safe and in good hands.

Store your PAAL AI cryptocurrency in non-custodial Web3 wallets
Store your PAAL AI cryptocurrency in non-custodial Web3 wallets:
“Not your keys not your coins”—this is a well-known phrase in crypto community. If security is what you are after, you should consider withdrawing your PAAL AI cryptocurrency to non-custodial wallet. Holding PAAL AI cryptocurrency in non-custodial or self-custodial wallet gives you complete control of your private keys. Practically you can use any kind of wallet. Such as hardware wallet, Web3 wallet or paper wallet. Note that this way could be less convenient if you plan to frequently trade your PAAL AI cryptocurrency or put your assets to work. Please ensure you securely store your private keys as loss of such could result in loss of your PAAL AI cryptocurrency permanently.
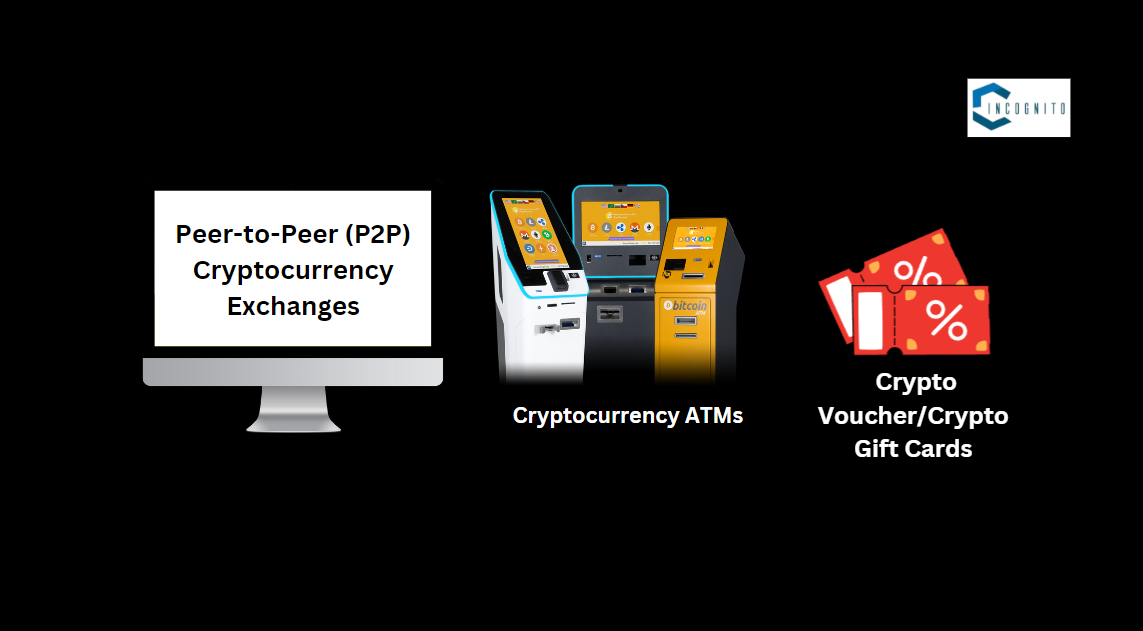
Other Ways to Purchase PAAL AI cryptocurrency: Peer-to-Peer (P2P) Cryptocurrency Exchanges, Cryptocurrency ATMs, Crypto Voucher/Crypto Gift Cards
Other Ways to Purchase PAAL AI cryptocurrency
Here are a few other ways to purchase this cryptocurrency that you might find interesting:
Peer-to-Peer (P2P) Cryptocurrency Exchanges:
A P2P exchange allows buyers and sellers to link directly in that they use their crypto to buy directly from each other. In this type of trading, you get the freedom to choose your preferred offers and trade with your counterpart directly. But beware of the potentially bad deals and fraudsters.
Cryptocurrency ATMs:
As we see with crypto coming into mainstream adoption the Crypto ATMs are being installed across the globe. The best way of obtaining PAAL AI is through the use of supported cryptocurrency ATMs that are found in your area.
Crypto Voucher/Crypto Gift Cards:
With crypto gift cards being a relatively less-used option, it is a good one. You just need to create an account using a gift card and exchange it for PAAL AI cryptocurrency when the offer has it.
Conclusion
Buying PAAL cryptocurrency means becoming a part of a prospective project. Make a choice: join the PAAL ecosystem by getting one of the most comfortable and secure platforms (CEX or DEX) for you.
Please remember that:
Research is Key: Cryptocurrency is a volatile market. Make good research about the project roadmap, team, and potential use cases of the PAAL cryptocurrency before investing.
Stay Informed: When it comes to staying informed, it simply means that look at their official website, social media, or some other channel to get the latest update. This way, you will always have enough data upon which to make any further decisions with transparency over your funds invested in PAAL tokens.
Be Part of Our Community: PAAL AI gains its definition by community contributions. Join their online communities where you can share experiences with other users, developers, and enthusiasts. It makes the environment so collaborative and allows you to provide input toward the growth of the project.
Buying PAAL cryptocurrency means not only making an investment but potentially contributing to the future of decentralized AI development. Whether you are a developer in search of a platform for your creations or a user in search of innovative AI solutions, PAAL AI has something up for grabs. Take the first step in owning a piece of the future now, and start with your PAAL AI acquisition journey.
How to Buy Bitcoin on eToro App: A Comprehensive Guide in 2024
More newbies seem to be attracted to crypto than ever before, and all asking themselves: ‘How can I buy Bitcoin?’ While not many crypto exchanges are slightly friendly to beginners, eToro is.
eToro is the preferred trading platform that makes purchasing Bitcoin quite easy.
In this article we will show you how to buy Bitcoin on eToro app in such a way that you will become comfortable while using the service.
Create an Account with eToro
How to Buy Bitcoin on eToro App
Let’s being the magic here!
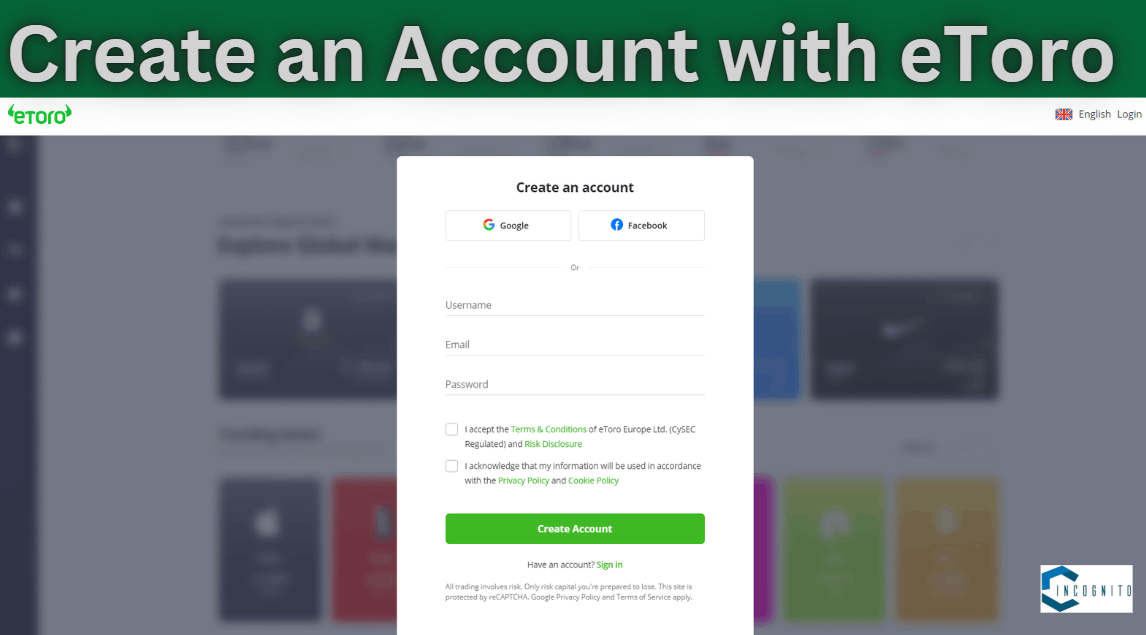
Step 1: Create an account with eToro
The account opening process is quick and straightforward by performing the following steps;
- Go to the official website of eToro.
- Now look for the “Join Now” or “Sign Up” button on the eToro home page and click on it to start the procedure for an account.
- Then enter your Personal Information.
- Carefully read and agree to the terms and cashback’s conditions and any other attached legal document or disclaimer through the registration process.
- Confirm your Email Address.
- Prompt will be shown up at the beginning to complete your eToro profile. They are going to ask you for some details/proofs like date of birth, telephone number, country of residence with photos, proof of your address like utility bills. It’s done for the regulatory matters.
Deposit Funds in your eToro Account
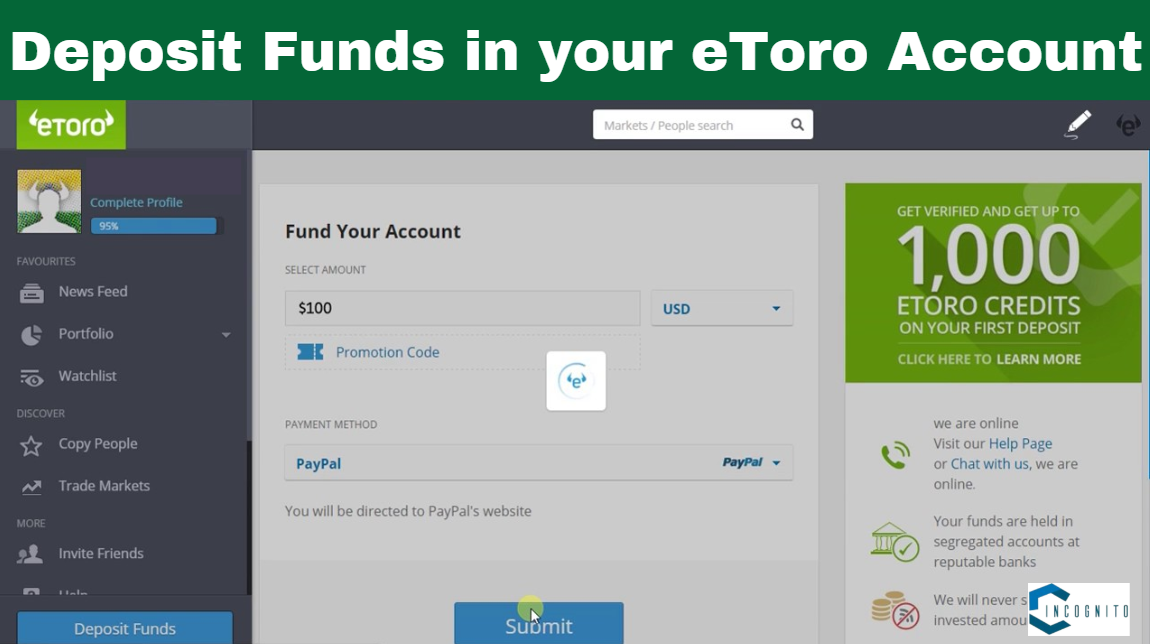
Step 2: Deposit funds in your eToro account
Now before investing in Bitcoin first deposit the money in your eToro account:
- Credit/Debit Card: eToro accepts Visa, Mastercard, Diners Club, or Maestro cards. Deposits are quick and instant.
- Bank Transfer: You can fund your eToro account with a bank transfer which might take hours to a few business days depending on which bank and country you originate your transfer from.
- E-wallets: eToro supports popular e-wallet services like PayPal for faster processing and extra security.
How to Deposit Funds on Your eToro Account
Step 3: How to deposit funds on your eToro account
Login into your eToro account.
- You have to click on “Deposit Funds” or “Deposit,” which you usually find in the main menu, account dashboard, or portfolio.
- Choose your payment method.
- Enter all necessary details, including card details or bank account details.
- Enter the amount to be deposited and then preview affiliated fees or the conversion rate.
- Check the details and click “Deposit” to advance the transaction.
- You may receive further verification or instructions to follow, depending on the payment method used.
- Once the process is finished you will be notified that the deposit was a success. The funds in your account can now be used for the intention of buying Bitcoin.

Find Bitcoin on eToro
Step 4: Find Bitcoin on eToro
Given that your funds are already in your eToro account, finding the Bitcoin trading pair will be easy as pie.
- Log in to your account at eToro.
- Now use the search bar at the very top of the page or in the main menu bar.
- Then type in “Bitcoin” or “BTC” and hit enter or click on the magnifying glass button.
- The first search result will be “BTC”. Click on “Trade” to open the Bitcoin page.

Place a Buy Order
Step 5: Place a buy order
Now that you have located where Bitcoin lives inside eToro, it is now time to place a buy order and finally have some Bitcoins in your pocket. For that, you can place an order with ease in eToro.
- On each of the Bitcoin page, click the correct tab and then click on “Invest”.
- Select either “Trade” (the market price of the moment) or “Order” (predefined purchase order).
- Set the figure of the amount that you’d like to invest.
- Go through the information on the transaction and information on the fees.
- Get better acquainted with the order preferences.
- Carefully go through the order information again.
- By clicking “Buy,” you have now confirmed the order.
- Your order will now be executed according to your set parameters by eToro.
Step 6: Track your investment in Bitcoin
Tracking your investment will become very easy on eToro with just some simple steps to follow:
- Use the portfolio option provided to you under “portfolio” heading.
- Track how it is performing, such as current value, size of gains or losses, and percentage change.
- Set price alerts to remain informed.
- Have information on market trends and news.
- Think about risk-management strategies, such as stop-loss orders.
- Review your investment and trading strategy regularly.
- Use eToro’s educational resources.
Conclusion
Buying Bitcoin on eToro provides a thrilling opportunity for all who are keen to get into the magic world of cryptocurrencies. In the following generalized buying BTC manual on eToro, you can easily find yourself confidently participating in the discussion about investing in the world of Bitcoin. Just bear in mind while making any of the decisions, do your homework to know the risks coming with that.
When is the iPhone 16 Coming Out? Know about the expected Price, Battery, Storage and much more
“When is the iPhone 16 Coming Out?”
Well, friend, what’s so hurry! Let’s first have a little chit-chat about iPhone and then we can talk about its release date.
So, I have been proudly carrying my new iPhone 15 for the past 5 months, thinking that the new iPhone 16 would take a little while to come out, but guess what? The rumors have started doing the rounds of its possible release very soon!
The debates are hot on everything from design leaks to rumored specs, camera changes, and lots more. Most rumors indicate that iPhone 16 series will come up with four models:
- iPhone 16
- iPhone 16 Plus
- iPhone 16 Pro
- iPhone 16 Pro Max
We are expecting some bigger changes with the iPhone 16 than we got with the iPhone 15 so we have rounded up all the major rumors here for you.
Keep reading, keep learning!
Design and Display
Design and Display
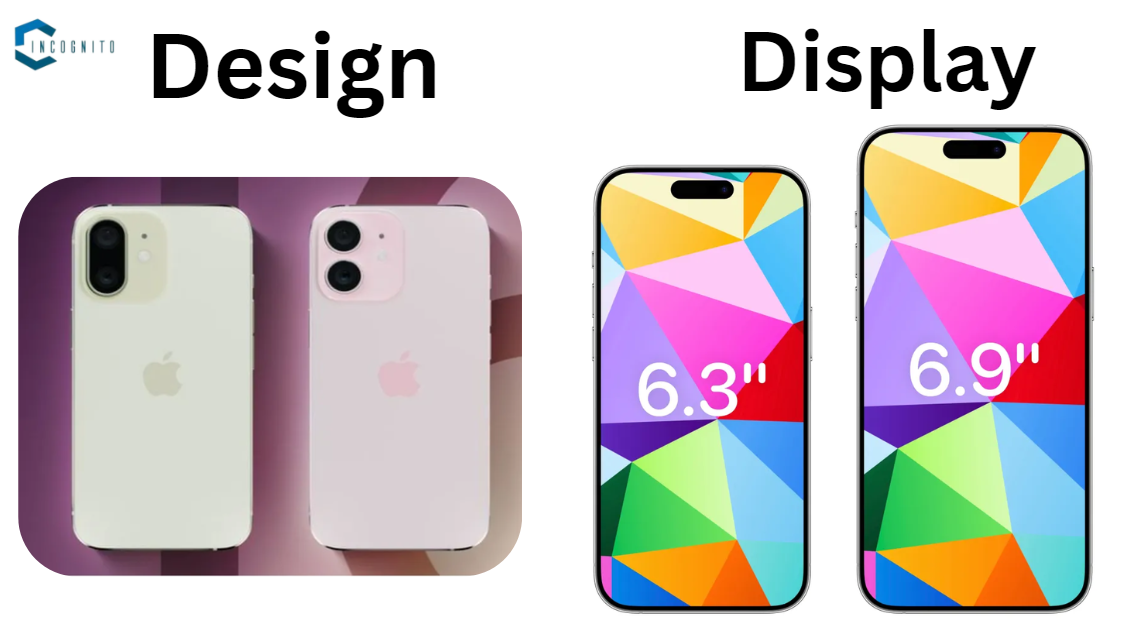
In general, the iPhone 16 lineup is speculated to sport some design changes over the iPhone 15. Normal variants of the iPhone 16 and iPhone 16 Plus are claimed to retain the same dimensions as that of the iPhone 15 model. However, the new iPhone 16 Pro and iPhone 16 Pro Max might see an increase in display size.
The new iPhone 16 Pro will feature a 6.27″ (rounded down to 6.3″) touch screen, while the iPhone 16 Pro Max will have an even larger screen at 6.85 inches (rounded up to 6.9 inches). Although these Pros will allot a bigger display, it also means a taller and wider body. At the same time, the thickness shall be kept similar to the iPhone 15 Pro at 8.25 mm.
Another speculation has been hidden Face ID parts in the iPhone 16 Pro models.

Capture Button
Capture Button
One of the more interesting features that could come to all of the iPhone 16 series is a new capacitive Capture Button. The new button could include actions like focus and zoom controls.
It is rumored that the Capture button is pressure-sensitive, triggering its response on the amount of force pressed on it and returning haptic feedback. You can also swipe left or right on the button to zoom in/out. While a lot of current smartphones already let you adjust the zoom with volume keys, Apple’s approach is that you won’t actually have to leave your Capture Button to perform a type of operation, thus making it more convenient.
Looking at some leaked case images recently, the iPhone 16 Capture button will be capacitive because iPhone 16 cases will include a cutout instead of having a regular button cover that usually goes over a clickable button. It will also sit at the bottom right part of the side frame, so it sits right under your right fingerprint when you turn the phone sideways in landscape mode.

Color
Color
Looks like the iPhone 16 and iPhone 16 Plus models will be available in these colors: Black, Green, Pink, Blue, and White. This rumor comes courtesy of Apple analyst Ming-Chi Kuo—whose record is unbelievably accurate for spilling Apple related stuffs.
The color option for the iPhone 16 Pro, on the other hand, might be Space Black, White, Gray, and Rose Gold. Typically, regular iPhones are available in almost similar colors to these, but we would not expect them to be offered in the very same colors.

Camera
Camera
One of the leading focuses for Apple in iPhone updates have to be cameras, and with the iPhone 16, something is sure to change in imaging capabilities.
If rumors are to be believed, the regular iPhone 16 will come fitted with two cameras: a main 48MP sensor and a 12MP ultra-wide sensor while adding a 12MP telephoto lens. The iPhone 16 Pro Max might go one step further by possibly incorporating a new Super telephoto periscope lens which some are calling a tetraprism.
The rumors also indicating that the iPhone 16 Pro and iPhone 16 Pro Max will have a 48MP ultra wide camera! Some reports show an increased main sensor for the iPhone 16 Pro Max, which can still work at 48MP.
Further, it appears very plausible that few models of the iPhone 16 will come with vertical camera designs!
A YouTube channel named EFTM has gotten some metal dummy units for what appears to be the iPhone 16, iPhone 16 Plus, iPhone 16 Pro, and iPhone 16 Pro Max. Dummy units are quite important to case and accessory manufacturers since they make their accessories based on them so they are ready in time for the actual product launch.
The dummy units received by EFTM apparently confirm vertical camera modules for the iPhone 16 and iPhone 16 Plus.
Release Date: When is the iPhone 16 Coming Out?
Finally, the release date!
Apple hosts its annual iPhone event in September basically every year, so we’d expect the timeline to remain roughly the same for the iPhone 16. New iPhones tend to be released right around a week later, normally the Friday of the following week. Sometimes Apple will space out the release dates for particular models, especially when it’s introducing a new design or size. So it shouldn’t be impossible to have more than one release date for the iPhone 16 lineup.

Chipset
Chipset
Under the hood, the iPhone 16 series might come with Apple’s latest A-series chips. An A17 Pro chipset could power the regular iPhone 16, though the Pros—especially the iPhone 16 Pro and the iPhone 16 Pro Max—will pack in a more potent A18 Pro or A18 Bionic chip.
It is rumored that these new chips are based on a process node of 3 nanometers, which would bring efficiency and performance gains over the 5-nanometer A16 Bionic chip used in the iPhone 15 Pro models. The exact performance gains are yet to be confirmed, though.
Storage
Recent rumors suggest that Apple is looking to push 8GB of RAM and 256GB of storage to the minimum in all the models across the iPhone 16 lineup. This is because on-device AI integration that takes up lots of storage. AI models need tons of data to be fed to them, hence raising the requirements for storage. RAM, too, would be an essential constituent for AI processing; hence, it would also call for another upgrade.
The iPhone 16 and an iPhone 16 Plus will go up to 512GB in terms of maximum storage, while the Pro models such as iPhone 16 Pro and iPhone 16 Pro Max will go all the way up to as much as 1TB of storage. There’s been some chattering about a possible version with 2TB of storage; however, on our probability radar, the latter is low.
Battery Life
Battery Life
On the battery life, most iPhone 16 models are reportedly going to pack a slightly increased battery capacity in comparison to iPhone 15 series. Now the standard iPhone 16 model is said to come with a 3,561mAh battery, and that in the iPhone 15 comes with a 3,349mAh battery. The largest battery will belong to the iPhone 16 Pro Max, at 4,676mAh, compared to 4,422mAh in the iPhone 15 Pro Max.
The iPhone 16 Pro models also come with rumors of having stacked battery technology that will help increase capacity and prolong its life. It will also reportedly have faster 40W wired charging and support for 20W MagSafe wireless charging.

Software and Features
Software and Features
The iPhone 16 series will have iOS 18, which Apple released officially at WWDC 2024. Presently, this new software update can include major revamping efforts for basic apps and features of the iPhone devices, resulting in an enormously improved experience while using the iPhone 16 series.
One of the more noticeable features to come to all four iPhone 16 models is an Action button, which first appeared on the iPhone 15 Pro and iPhone 15 Pro Max. It can be assigned to any action one wants, be it opening a specific app or activating shortcuts.
It is also speculated that the iPhone 16 Pro models will come with more RAM and uniquely designed storage for AI. This might prove that Apple really enhanced the phones’ edge AI to allow most sophisticated computational photography and advanced voice recognition, among other AI-backed capabilities.
Price
Although Apple has not announced the official pricing of its iPhone 16 series, new models are likely to be competitively priced, according to industry analysts. There is a rumor that Apple may have to increase the price of iPhone 16 over iPhone 15 to not affect the revenue since the component price in the iPhone 15 lineup was highest ever.
Related: Prices of different iPhone models reduced in India
Availability
Availability-wise, the iPhone 16 series will be available for pre-order shortly after the announcement event taking place in September 2024, and the first units will not start shipping to customers until about a week later. The release date is really dependent on how things go with Apple’s production schedule and supply chain constraints around that time.
Conclusion
We can see that the iPhone 16 series is the next major that are expected to flood the market soon. It is likely that the improvements could be seen in the design, the size of the display, its camera and performance, and battery power, which makes it to be one among the most technologically innovative smartphone that will be launched in 2024.
Although the actual release date is still uncertain, field experts have predicted it to be announced in September 2024 and sold shortly after. According to tradition, Apple, and many other enthusiasts of technology are always poised to see what new features the new iPhone 16 series has in store for them, promising the ultimate mobile experience.
How to Spoiler on Discord: A Step-by-Step Guide
I’m sure you must have used Discord and without any doubt, would have decorated your messages with emojis, GIFs, and images. However, sometimes you receive the message that contains spoilers of the movies (which you were about to see in the coming weekend!), or a novel (which you have just started reading!), or some other thing.
The ‘spoiler,’ which the name itself suggests, reveals the important aspect that you didn’t wish to be revealed at an early stage. It’s almost impossible to ignore the text in a message while you are scrolling it. Somewhere, you will see the spoiler that will spoil your mood!
Thankfully, considering the sensitivity of the users, Discord has come out with a perfect solution – Spoiler Tags. Now if you are sharing something which can be termed as ‘secret,’ then you can flag that message as spoiler. As a result, the text is sent but blacked out so that the users who don’t wish to see it can easily ignore it while those who aren’t afraid of spoilers can click and see it.
What are Spoiler Tags?
If a post has some spoilers, then the spoiler tag labels them so that the reader can either choose to ignore it or see it. The thumbnails and the images of the tagged post will remain hidden until the user wishes to see it.
The original poster and moderators can mark a post as containing spoilers. Furthermore, if a post Title contains ‘spoiler’ or ‘spoilers,’ it will be automatically classified as a spoiler. However, titles that include ‘no spoiler’ or ‘no spoilers’ will not be automatically labeled. This is consistent with the behavior of the NSFW (not safe for work) tag.
So, after going through this much article, you must be having a very valid question popping-up in your mind — how to spoiler on Discord?
Sure, we will talk about it more in the upcoming paragraphs.
So, keep reading and keep learning.
How to Spoiler on Discord to Hide Text Messages?
Phew! Finally, we are here! Now let’s discuss how to use spoiler on Discord effectively.
Okay, so there are two methods to achieve it and you choose which one you find easy to follow. However, it’s worth mentioning that you may find some method available only on the desktop version of Discord.
Method 1: Adding Spoiler Text using Tag on Discord
Okay, the first method is by using the spoiler tag where all you have to do is to add a spoiler tag on Discord. Follow the below steps to learn and implement it:
- To begin, open the Discord application on your device and enter your login information.
- Next, choose a server from your list of servers or select a friend from your friend list.
- Type your message into the chat box.
- Then add the ‘||’ symbols before and after any spoiler content to keep it hidden.
- For example, you could write something like “Hey everyone, I have a surprise ||spoiler alert||”
- Alternatively, you an also add ‘/spoiler’ before the spoiler content instead of ‘||’.
- Finally, click on the enter key to send the message tagged as spoiler without spoiling anything.
This method works on Discord’s desktop app, mobile app, and browser. So this might become your favorite way of hiding your message.

How to Spoiler on Discord: Adding Spoiler Text using Tag
Method 2: Marking Messages with Spoiler Icon
Just like method 1, this method is also quite simple and straightforward. More importantly, Discord recently updated this method which allows you to add the spoiler icon quickly.
Follow the below steps to learn and implement it:
- To begin with, type in the spoiler content in the chat box.
- Then, highlight (selected) the spoiler part of the text.
- A floating bar will appear after the content is highlighted.
- Now click the ‘eye’ symbol. and then the ‘||’ mark will immediately appear next to the highlighted text, and that message will be automatically spoiled.
- Finally, hit the send button and the text will be sent to the server where the receiver will have the choice to either see it or ignore it.
How to Spoiler on Discord: Marking Messages with Spoiler Icon
An important thing must be mentioned here that this method is available on the Discord desktop app and browser version only. For iOS, the steps are quite similar, with the only variation being that you need to choose the spoiler mark from the context menu.
Alright! Till now we’ve learnt about how to spoiler on text, but what about images and videos on Discord? Does the spoiler tag work on them too?
Well, let’s find out.
Adding Spoiler to Image and Video on Discord
So, the answer to the above question is YES. You can add (mark) spoiler to images, videos, and even other attachments on Discord, just like texts.
However, it should be noted that the process of marking images and videos as a spoiler differs slightly from that of texts. So, how do you add other files spoiler tags? Images can be and should be tagged as spoilers before you upload them on servers.
Follow the below steps to learn and implement it:
- First of all, open Discord on your desktop app or browser.
- Then select the image or video that you want to send on the server.
- Now drag the image/video to your server chat and relese it there.
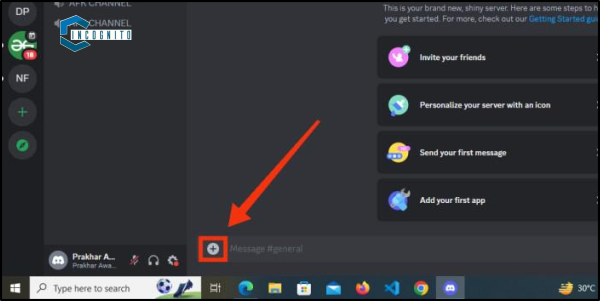
- Next, tap on the Plus sign (+).
- Now choose ‘Mark as Spoiler’ from the options.
- Once done, hit the Upload button.
The tag will blur the image first and then will send it to the server. Now it’s up to the receivers if they want to see it or not. If anyone wants to see it, then he or she has to tap on it to reveal the image or video.

How to Spoiler on Discord: Adding Spoiler to Image and Video
An important message for you guys: the spoilers that contain images, videos, or other multimedia files can be sent only via desktop app or the browser. Unfortunately, as of now, mobile apps do not support spoiler marks for images and other media files.
Alright! So, now you know how to add spoiler to texts, images, and videos; but what if you want to turn the spoiler tag off! How would you do it?
Well, keep reading the article.
How to turn off the Spoiler tag?
If you find yourself wanting to unveil spoiler texts by removing spoiler tag, simply head to your User Settings and click on Text & Images. From there, navigate to the Show Spoiler Content section where you can adjust the settings for when spoiler content is revealed. The options that you can choose are — display on click, on servers I moderate, and always.
If you wish to view all spoilers, you can select the Always option to turn off the spoiler tag. If you later decide to hide them again, you can do so using the same menu.
How to turn off the Spoiler tag
Conclusion
This article discusses the use of the Discord spoiler tag, which can be utilized to conceal texts, images, and videos. It is possible to turn the spoiler tag on and off multiple times. When sharing important information or unveiling a secret on your Discord server, remember to apply the spoiler tag.
You can visit the official website to know more about.
Fallout 76 Crossplay: Is it a Wasteland Out There, or Can You Play with Everyone?
Is Fallout 76 Crossplay? Can you play with everyone or is it really a wasteland?
Keep reading this article to know everything about it.
A little history before we finally break-in
Fallout 76 is a very popular game which is set in an imaginary place However, a nuclear war happened and it destroyed the whole place causing a wasteland and giving birth to mutant species!
So, your work as a gamer is to rebuilt the world, fight with the bad mutants and even team-up with other players to increase your survivability.
However, if you and your friend are using two completely different platforms (like PlayStation and Xbox) then how are you going to play together!
This is where something called “crossplay” comes in. Imagine you have a set of awesome building blocks, but your friend has a different brand with totally different shapes. Normally, you can’t build amazing things together because the blocks don’t fit!
But with crossplay, it’d be like having magic building blocks that can connect no matter what brand they are. You and your friend could build incredible forts together, even though you have different sets!

History of Fallout 76
Can You Use Your Magic Building Blocks (Crossplay) in Fallout 76?
The simple and straightaway answer is NO! If you use a PlayStation, you can only play with other PlayStation players. The same is true for Xbox and PC. It’s like having different playgrounds for each brand of building blocks, even though the wasteland is giant enough for everyone!
What are the reasons that games don’t have crossplay?
Sometimes, the companies that make the gaming machines (like PlayStation, Xbox, and the companies that make computers) have different rules or settings that make it hard to connect everything together. It’s like having different playground rules at each park!
It can also be tricky for the game makers (Bethesda in this case) to get everything working smoothly across different devices, kind of like making sure all the building blocks connect perfectly, no matter the brand.

Why games Don’t Have Crossplay?
Do People Want to Build Forts Together in the Wasteland (Crossplay in Fallout 76)?
Absolutely! So many people want to play games together even if they have different game systems. Picture going on an adventure in a deserted place with your best friend, even if they are using a different device. It would be a lot more fun and exciting to fight off mutated creatures, discover hidden secrets, and build awesome camps together!

Do People Want to Build Forts Together in the Wasteland (Crossplay in Fallout 76)?
Is There Any Hope for Magic Building Blocks (Crossplay) in the Future?
While Bethesda’s game developers haven’t confirmed anything, they have stated that they’re constantly searching for ways to enhance Fallout 76 and introduce new features. Therefore, there’s a potential that crossplay will be included eventually!
It would be like the companies that make the playgrounds finally agreeing to let everyone play together, with their own building blocks of course!
What Can You Do Until Then?
If you really want to play with a friend who has a different gaming machine, you might have to convince them to get Fallout 76 for the same device you have. It’d be like getting the same brand of building blocks so you can finally build forts together!
You could also try playing other games that do have crossplay, so you can team up with your friend in a different wasteland adventure! There are lots of cool games out there with different stories and worlds to explore.
Looking Ahead:
While you can’t play with everyone yet, Fallout 76 offers plenty of ways to have fun. You can:
- Make new friends online: Many players use microphones or text chat to connect with others on the same platform as you.
- Build incredible settlements: Gather resources and unleash your creativity to build your own unique post-apocalyptic haven.
- Team up with existing players: Many online communities exist specifically for Fallout 76. Find others using the same device and embark on adventures together!
- Explore other games with crossplay: Many exciting games allow players from different platforms to team up. Consider exploring another wasteland adventure with your friends in a different game that offers crossplay functionality!
Alternatives
There will come a time when you become bored with playing Fallout 76, or simply want to try something new and refreshing. Thankfully, there are many great alternatives out there to play.
Here’s the curated list of top three alternative games for you:
1. Don’t Starve:
It is a survival game for those who take pleasure in pain and suffering (masochist). Set within a 2-D, hand-drawn world, Don’t Starve has some of the most captivating graphics combined with perhaps the most unforgiving and brutal mechanics of any game on this list. It explains almost nothing to you, and I have to say that’s pretty refreshing.
2. Subnautica:
It’s one of my favorite games on this list. A nearly completely underwater survival game, Subnautica explains a well-told story with survival mechanics, unique building, complete terror, and some of the best exploration. Every time you stumble into a new area or a new creature with this game, it’s jaw-dropping.
3. The Long Dark
Long Dark is trying to be, if anything, among the most merciless and realistic survival games out there, and boy, I gotta say, it worked at doing that. What’s more is that it’s always pretty good, too. You can play through a story mode here, or just play in free-mode and see how long you can survive.
Related: Check about Fallout 5 here
Conclusion
Even though you can’t play with everyone right now, Fallout 76 is still a massive wasteland filled with tons of things to do! You can explore all by yourself, make new friends online with people who have the same device as you, build amazing camps, fight off mutated creatures (don’t worry, they’re not real!), and have a ton of fun.
The wasteland might be a bit lonely without your best friend by your side, but there’s still plenty to discover and enjoy until you can finally build forts together with your magic building blocks (crossplay)!
YouTube to MP3 Converter? Wait! Are you aware of the legal complexities? Read out here
In this digital information age, music lovers have a lot of ways through which they can discover and enjoy their favorite tunes. One of the famous platforms transforming the way in which we consume music is YouTube. With its rich library of songs, it has become a place to be for a music lover.
And this tempts the users to download the songs or videos from the YouTube by using some YouTube to MP3 converter.
However, you need to be aware of legal and illegal YouTube to MP3 converters that will keep you on the right side of the law.
Keep reading, keep learning!

Understanding the Legality of YouTube to MP3 Converters
Understanding the Legality of YouTube to MP3 Converters
You must bear in mind that copying or downloading of copyrighted content without permission may be open to prosecution.
Well on the legality of YouTube to MP3 converters, everything is pretty complicated and depends both on the tool itself and the location of the user. While some work within the bounds of legality, others sometimes violate copyright laws and the Terms of Service set by YouTube.
Alright, let’s check some Legal and Illegal YouTube to MP3 Converters.
Legal YouTube to MP3 Converters
While there are plenty of tools out there to convert YouTube to MP3, a majority of these happen to be illegal. So, a couple of legal options could be used to convert videos from YouTube into MP3 format. They include:

YouTube Premium
1. YouTube Premium
YouTube Premium is the official way to download videos from YouTube for offline playback. It lets you download any video in MP4 format. The videos are kept in the YouTube app but may be listened to with a locked screen or app minimized.
The main benefits of using YouTube Premium include the following:
- Official YouTube feature – Downloads come authorized by YouTube
- High-quality MP4 downloads
- Downloads stored in official YouTube app
- No ads in downloaded videos
- Includes access to YouTube Music Premium
The downside is it costs $11.99/month. YouTube Premium is really designed for downloading videos to watch later, not specifically for converting to MP3. But it is the only fully legal way to download YouTube videos.

YouTube Music Premium
2. YouTube Music Premium
YouTube Music Premium is the music sibling to YouTube Premium targeted especially at music. For $9.99 a month, YouTube Music Premium offers downloads for any song or album in high-quality MP3.
Key features of YouTube Music Premium include:
- Official YouTube music service
- Downloads are authorized by YouTube
- Downloads in high-quality MP3
- Downloads stored in YouTube Music app
- No ads in downloaded music
- Includes access to YouTube Music’s full catalog
The downside again is the subscription fee. YouTube Music Premium is the only legal route for downloading YouTube music videos as MP3s.

Illegal YouTube to MP3 Converters
Illegal YouTube to MP3 Converters
Apart from the legal ways you can also convert and download YouTube videos to MP3 in not so legal way. There are number of illegal YouTube to MP3 converter websites and apps that will let you do it free. Of course, these are not authorized by YouTube and violate the terms of service.
Some examples of such illegal YouTube to MP3 converters include:
- SaveFrom.net
- KeepVid.com
- YTMP3.cc
- OnlineVideoConverter.com
- MP3Juices.cc
These websites operate based on having users enter the URL of a YouTube video. After doing so, the audio from the video is extracted and one can download it in MP3 file format. Some even offer options for downloading the actual video in MP4 format.
Major benefits associated with illegal YouTube to MP3 converters include the following:
- Free to use
- Enables download of any video from YouTube in MP3 format
- No subscription needed
However, there are major disadvantages:
- Violates YouTube’s Terms of Service
- Exposure to malware
- Poor quality download
- Unreliable websites
- Legal cases
Conclusion
Whereas a number of tools exist for the purpose of YouTube to MP3 conversion, only YouTube Premium and YouTube Music Premium are the legal ways for doing so. These official services let one download high quality videos and songs from YouTube but charge for the subscription.
The remaining sites and applications for YouTube to MP3 converters are illegal, infringing on YouTube’s terms of service. Sure, they might be convenient and free, but they come with such major risks as malware, poor quality downloads, and legal issues. It’s simply not worth the risks.
In summary, just use the legal options, steer clear of the dodgy YouTube to MP3 converter sites, and enjoy your YouTube downloads safely and responsibly. Yes, the extra cost is very much worth it to download YouTube videos in the right way with a YouTube Premium subscription.
How to Turn Off Siri on Airpods in 2024? Make the listening experience on your iPhone, iPad, and Mac great again!
What if you are having your feet tapping to one of your favorite songs, or maybe you are just listening to the podcast, and Siri suddenly activates to interrupt your enjoyment?
You would feel frustrated and annoyed. Don’t you?
To know how to turn off Siri on AirPods: keep reading and keep learning.
How Does Siri Work on the AirPods?
How Does Siri Work on the AirPods?
Siri is voiceActivated assistant of Apple that help users in performing a number of tasks, hands-free. It can send messages and even make calls, apart from delivering information and controlling smart devices at home. On AirPods, Siri can be activated with gestures or by double tapping its earbuds, or with “Hey Siri.”.
This may sometimes result in unintended key presses, which can interfere with your audio experience. Fortunately, you have an easy way to turn Siri off on AirPods.

Why You Should Manage Your Siri Settings
Why You Should Manage Your Siri Settings
Surely Siri is very handy but there might be situations where you would really prefer to turn it off. Say you happen to be somebody who is constantly listening to music on your AirPods in a noisy atmosphere or during exercise; accidental activation of Siri can really get on your nerves.
Also, some users can be very sensitive to having voice assistant listening for commands, especially in public or even in private. You can further customize settings with Siri to make your AirPods experience even better.
How to Turn Off Siri on AirPods Using an iPhone or iPad
How to Turn Off Siri on AirPods Using an iPhone or iPad
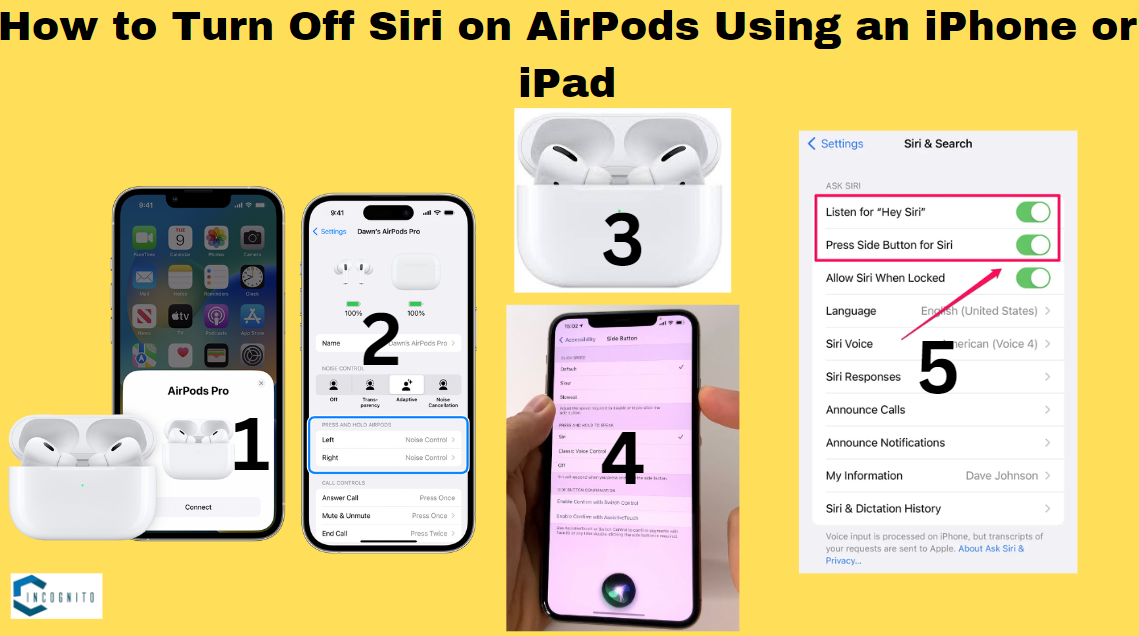
You can turn off Siri on the AirPods from an iPhone or an iPad by following these steps:
Step 1: Connect Your AirPods
In case you are not connected, just open the case nearby and follow the on-screen instructions to connect. The AirPods indicator will let you know that you are Connected.
Step 2: Go to Settings
- Open the Setting app on your device. This app is normally on the home screen. It looks like a gear.
- Scroll down and tap Bluetooth. It will open the Bluetooth settings, showing you all the connected devices.
Step 3: Choose Your AirPods
- In the list of devices connected, you will see the AirPods (or whatever name you have given), select that.
- Tap the info (i) button next to your AirPods. It will open a menu with various settings just related to your AirPods.
Step 4: Set Up Press and Hold
- At the bottom, you will find the Press and Hold AirPods section with an option for the Left and Right AirPods.
- Change both the Left and Right to Noise Control or any other action that doesn’t turn on Siri. It will prevent you from accidentally turning it on when you tap on your AirPods.
Step 5: Turn off “Hey Siri”
You do not want to have Siri activated with voice commands, so you must turn off “Hey Siri”:
- Tap on the Settings
- Scroll down and tap on Siri & Search. This section contains all the settings related to Siri.
- Turn the Listen for “Hey Siri” switch off. This will ensure that your device won’t respond to the voice command as you are using your AirPods.
Step 6: Additional Settings in Siri
In case you still want to restrict Siri’s functionality, you can switch off these following items:
- Press Side Button for Siri: This configuration does not allow Siri using the side button of your iPhone.
- Allow Siri When Locked: By turning this off, it is ensured that Siri can’t be accessed from a locked device.
Turning Off Siri from AirPods on a Mac
Turning Off Siri from AirPods on a Mac
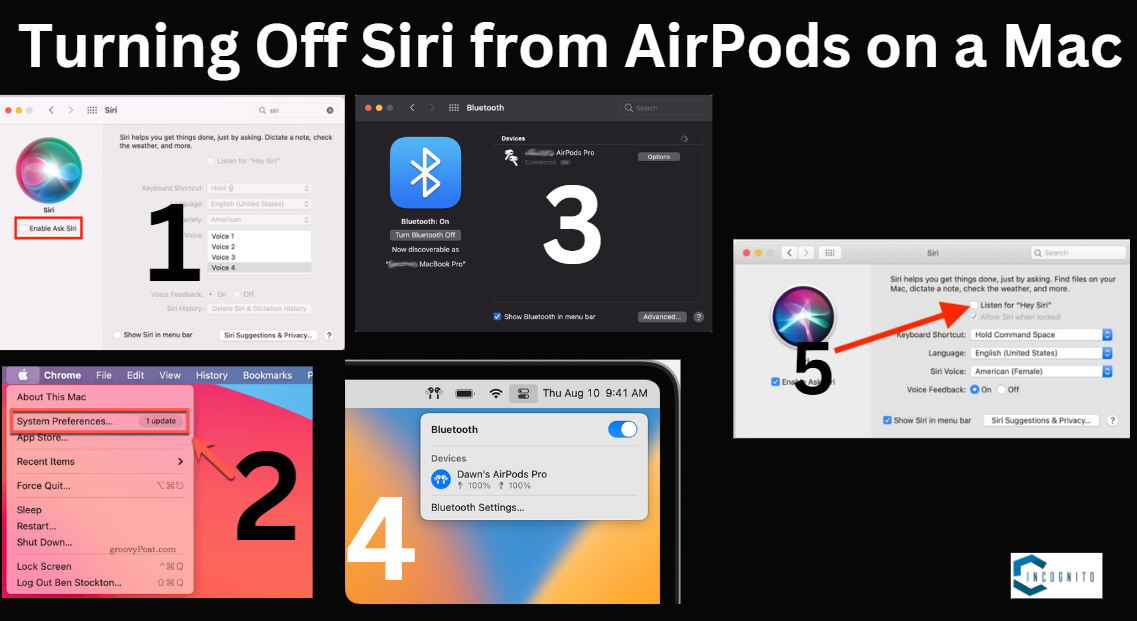
If you want to use your Mac to turn off Siri on your AirPods, follow these steps:
Step 1: Connect Your AirPods
- Connecting can be done through the Bluetooth settings by tapping on the Bluetooth icon from the menu bar.
Step 2: Open System Preferences
- On the top-left of the screen, click the Apple logo.
- Tap the System Preferences option from the dropDown menu.
Step 3: Accessing the Bluetooth Settings
- Click on Bluetooth. This will show a list of all the connected devices on your Mac.
- Find your AirPods in the list and select the Options button next to them.
Step 4: Modify Press and Hold Settings
- In the dropdown menus, Press & Hold Left AirPod and Press & Hold Right AirPod, select options other than Siri. You can choose either Noise Control or Play/Pause. In this way, you will not accidentally trigger Siri while using the AirPods.
Step 5: How to turn off Siri Completely on your Mac
- Go back to the System Preferences window
- Click on Siri.
- Uncheck the Enable Ask Siri option to disable it. This will turn the assistant off completely on your Mac and will prevent it from responding to any Siri commands.

Why Turn Off Siri on AirPods?
Why Turn Off Siri on AirPods?
There might be several reasons for you to disable Siri on your AirPods. They are as follows:
1. Accidental Activations:
Many users say that Siri is turned on by merely adjusting their AirPods, especially during sports activities or in a place with too many people. It’s distracting and dismisses whatever is playing in your ears.
2. Privacy Concerns:
Some users prefer not to have any voice assistant listening for commands, mostly in public places or private spaces. There is a serenity to the mind brought by turning off Siri about privacy.
3. Uninterrupted Listening:
If you were to turn off Siri, it would mean a more pleasant, uninterrupted music, podcasts, or audiobooks while playing. This is highly useful while one is on a long listening session or focused on tasks.
4. Battery Life:
While this may not have a big effect, turning off Siri could really help in saving some battery life for your AirPods. With every feature switched off, you’re sure of long use before charging.
Conclusion
There may be a significant improvement noticed in the listening experience if Siri is turned off on your AirPods. Following the steps, one by one, which are featured for both iPhone/iPad and Mac, will enable you to avoid accidental activations and enjoy uninterrupted audio. Whether you use your AirPods to listen to music, podcasts, or have calls with them, it’s always much better when Siri is turned off.
Should you want to turn Siri On, follow these same steps again and select to turn it on. Ultimately, having that power over all the settings of your AirPods creates far greater tailoring of the audio experience in your life according to your purposes and desires.
5 Snapchat Tricks for Newbies and Advanced Users (Pssst, No. 4 might surprise you!)
Snapchat in itself is a very dynamic platform, and its changing day in and out with new features for its users. From cool filters to some highly interactive tools, Snapchat has everything.
So here are five essential Snapchat tricks that will help take your Snapchat experience to the next level and make your snaps engaging, more entertaining, and full of fun.
Keep reading, keep learning!
Here are the 5 Snapchat Tricks
Now all you have to do is scroll-down till the last to learn all the tricks.

Apply Multiple Filters on a Single Snap
1. Apply Multiple Filters on a single snap
Most interestingly, one of the features in Snapchat is its ability to add many filters in one snap. By doing that, you can merge the effects, attaching a location filter together with the color filter; thus, making the post more vibrant and full of information.
Here is how you can apply multiple filters:
- Take a Snap: First of all, open your app and capture a picture or record a video as usual.
- Tap Your First Filter: Swipe your finger left or right on the screen to set your first filter.
- Lock Your First Filter: With your thumb, hold down on the screen and lock the first filter.
- Apply More Filters: Using the other hand, swipe through the filters to select the second one. You can remove a thumb for a short time in order to change to the following filter, then press a little to get the filter locked.
- Repeat for a Third Filter: You can add the third filter following the same steps which now allows you to create a combination unique enough to make your snap visually amazing.

Create Custom Stickers
2. Create custom stickers
Use custom stickers to make your snaps personal. Since Snapchat allows making stickers from your own photos and drawings, it highly personalizes the snaps.
Steps to create Custom Stickers:
- Take a Photo: Take a photo of any interesting thing around to be used as a sticker.
- Select the Scissors Tool: Tap the scissors icon to go into sticker editing mode.
- Cut Out Your Sticker: Using your finger, trace around the part of the image you’d like to keep. When you let go, Snapchat will turn that selection into a sticker.
- Save Your Sticker: Now, you’ll be able to reuse this sticker in future snaps by pulling up the sticker menu.

Enable Travel Mode
3. Enable Travel Mode
Enable the Travel Mode if you have issues with data consumption or battery usage. This will ensure that Snapchat does not download snaps and stories on its own, rather, you are given the option of deciding when you want to view them.
Steps to enable Travel Mode:
- Your Profile: Tap Your Bitmoji or profile icon in the top left.
- Settings: Tap the gear icon to access your settings.
- Manage Additional Services: This is at the bottom, so scroll down to Additional Services and hit Manage.
- Enable Travel Mode: Turn Travel Mode On by flipping the switch. This makes snaps and stories load only when you tap on them. This will save data and battery.

Use the Magic Eraser Tool
4. Use the Magic Eraser Tool
Magic Eraser tool is one of the new features in Snapchat that allows you to remove unwanted objects or people from your snaps. This tool uses AI to help clean up your images and give them a polished look to your snaps.
Steps to use the Magic Eraser:
- Take a Snap: Capture the photo or video you would like to edit.
- Magic Eraser Tool: After taking the snap, go to the editing tools, you will see the option for a Magic Eraser.
- Erase Unwanted Elements: Now tap on the object or person you want to erase, and it will disappear before your eyes, blending in seamlessly at the background.

Share Private Stories
5. Private Stories
Now, Snapchat gives you an option to make a Private Story, which you can only share with the people in your selected friend list. This is good if you want to share a personal moment only with the people you can trust or with whom you would like to share it, thereby keeping it more private.
Steps to create a Private Stories:
- Create a New Story: Tap on the profile icon and then select ‘My Story’.
- Tap Private Story: Now tap on Private Story option.
- Select Friends: You can select which friends you want to add to this private story. The content shared in this story will only be visible to chosen friends.
- Share Your Story: After choosing your friends, tap Share to upload your private story.
Related: Learn about Snap Planets and Order
Conclusion
From applying multiple filters to creating your own stickers, turning on travel mode, using the magic eraser, sharing private stories, there’s more that Snapchat does to enhance your experience on social media. In this way, you will be able to make snaps even more exciting and personal.
Stay ahead of the game as Snapchat innovates more and more. Keeping yourself updated with these features will help in staying creative about your social interactions. Whether you use them to impress friends or to enjoy a bit of a personalized experience, these tricks will help in enhancing your Snapchat game.
Related: Read more about the Apps here.

